PALib graffiti
RTEMS for Nintendo DS
|
#include <bsp.h>
#include <rtems/fb.h>
#include <rtems/console.h>
#include <rtems/clockdrv.h>

#define CONFIGURE_HAS_OWN_DEVICE_DRIVER_TABLE

rtems_driver_address_table Device_drivers[] =
{
  CONSOLE_DRIVER_TABLE_ENTRY,
  CLOCK_DRIVER_TABLE_ENTRY,

  /* include framebuffer driver */
  FB_DRIVER_TABLE_ENTRY,

  { NULL,NULL, NULL,NULL,NULL, NULL }
};
As shown above, the other (standard) drivers must be included by hand
to.#include <rtems/mw_fb.h>The ioctl() operation is necessary to enter and leave the graphic mode and to get the framebuffer information.
FB_EXEC_FUNCTION: this ioctl passes a structure of
type fb_exec_function. Available function numbers (field
func_no) are:
FB_FUNC_ENTER_GRAPHICS: enters in graphic mode, no arguments.
FB_FUNC_EXIT_GRAPHICS: leave graphic mode, no arguments.
FB_SCREENINFO: fill a structure of type fb_screeninfo
with the framebuffer information. Fields of this structure include:
lcdSwap();
#include <rtems/sound.h>
#include <bsp.h>
#include <rtems/console.h>
#include <rtems/clockdrv.h>
#include <rtems/sound.h>

#define CONFIGURE_HAS_OWN_DEVICE_DRIVER_TABLE

rtems_driver_address_table Device_drivers[] =
{
  CONSOLE_DRIVER_TABLE_ENTRY,
  CLOCK_DRIVER_TABLE_ENTRY,

  /* include sound driver */
  SOUND_DRIVER_TABLE_ENTRY,

  { NULL,NULL, NULL,NULL,NULL, NULL }
};
SOUND_SVOL: set sound volume, take an integer between 0
(silent) and 127 (loud). Default: 64.
SOUND_GVOL: get sound volume, set an integer as result.
SOUND_SPAN: set sound panning, take an integer between 0
(left) and 127 (right). 64 is middle. Default: 64.
SOUND_GPAN: get sound panning, set an integer as result.
SOUND_SFMT: set the sound format, take an integer formed
with following macros:
SOUND_FREQ_11025: set sampling frequency to 11025 Hz.
SOUND_FREQ_22050: set sampling frequency to 22050 Hz.
SOUND_FREQ_44100: set sampling frequency to 44100 Hz.
SOUND_FREQ_RECORD: set sampling frequency to 16384 Hz
(microphone sampling frequency).
SOUND_FORMAT_8: set format to PCM8.
SOUND_FORMAT_16: set format to PCM16.
SOUND_GFMT: retrives sound format, set an integer as
result.
  int fd = open("/dev/pcm", O_WRONLY);
  int fmt = SOUND_FREQ_11025 | SOUND_FORMAT_8;

  ioctl(fd, SOUND_SFMT, &fmt);
  write(fd, sound1, &sound1_size);
  sleep(1);
  write(fd, sound2, &sound2_size);
Please, note that playing a sound in loop is not supported natively.SOUND_SRECLEN: set the maximum length of sound data to
record, in bytes.
SOUND_STARTREC: start recording.
SOUND_STOPREC: stop recording, returns the length of the
recorded sound.
  int fd = open("/dev/pcm", O_RDWR);
  int fmt = SOUND_FREQ_RECORD | SOUND_FORMAT_8;
  int len = 1000000;

  ioctl(fd, SOUND_SRECLEN, &len);
  /* record for 1 second */
  ioctl(fd, SOUND_STARTREC, 0);
  sleep(1);
  ioctl(fd, SOUND_STOPREC, &len);

  /* read recorded data */
  read(fd, buff, len)
  /* playback */
  ioctl(fd, SOUND_SFMT, &fmt);
  write(fd, buff, len);
Please, note that starting to record erases previously recorded data.LEFT and RIGHT on the pad are used as mouse
buttons in right-handed configuration, and A and B in
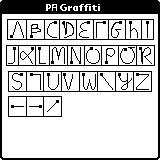
right-handed mode.L or R enables character recognition
(see section Using graffiti below).
#include <bsp.h>
#include <rtems/touchscreen.h>
#include <rtems/console.h>
#include <rtems/clockdrv.h>

#define CONFIGURE_HAS_OWN_DEVICE_DRIVER_TABLE

rtems_driver_address_table Device_drivers[] =
{
  CONSOLE_DRIVER_TABLE_ENTRY,
  CLOCK_DRIVER_TABLE_ENTRY,

  /* include touchscreen driver */
  TOUCHSCREEN_DRIVER_TABLE_ENTRY,

  { NULL,NULL, NULL,NULL,NULL, NULL }
};
The touchscreen driver needs the clock driver to be enabled.MW_UID_REGISTER_DEVICE: register a message queue for mouse
input. Take the queue name as a parameter.
MW_UID_UNREGISTER_DEVICE: unregister a message queue.
struct MW_UID_MESSAGE. Here are the fields of
this structure:
type: contain MV_UID_ABS_POS for mouse.
m.pos.btns: contain the buttons state, a combination of
MV_BUTTON_LEFT and MV_BUTTON_RIGHT.
m.pos.x: contain absolution position in x axis.
m.pos.y: contain absolution position in y axis.
#include <rtems/mw_uid.h>Using the MicroFramebuffer library, the code for mouse looks like:
uid_open_queue(name, 0, 10); // 30 messages queue
uid_register_device(open("/dev/mouse", O_RDONLY), name);
...
struct MW_UID_MESSAGE m;
uid_read_message(&m, 0);
Passing the touchscreen from right-handed mode to left-handed mode is
also done through ioctl on /dev/mouse:
MW_UID_SET_LEFTHANDED
MW_UID_SET_RIGHTHANDED
touchPosition pos = touchReadXY();
int k = keysDown();
See libnds help for more information.
char c = getchar();This operation is blocking.
MW_UID_REGISTER_DEVICE: register a message queue for keyboard
input. Take the queue name as a parameter.
MW_UID_UNREGISTER_DEVICE: unregister a message queue.
struct MW_UID_MESSAGE. Here are the fields of
this structure:
type: contain MV_UID_KBD for keyboard input.
kbd.mode: contain MV_KEY_MODE_ASCII.
kdb.code: contain the character typed by the user.
uid_open_queue(name, 0, 10); // 10 messages queue
uid_register_device(open("/dev/console", O_RDONLY), name);
...
struct MW_UID_MESSAGE m;
uid_read_message(&m, 0);
This technique is used by MicroWindows and Nano-X.$ tar xjf microwindows-src-0.91.tar.gzIn the file src/config, change the following definitions:
ARCH                  = RTEMS
RTEMSTOOLSPREFIX      = arm-rtems4.8-
SCREEN_PIXTYPE        = MWPF_TRUECOLOR555
THREADSAFE            = N
SHAREDLIBS            = N
HAVE_JPEG_SUPPORT     = N
HAVE_FNT_SUPPORT      = N
HAVE_FNTGZ_SUPPORT    = N
HAVE_FREETYPE_SUPPORT = N
HAVE_PCF_SUPPORT      = N
HAVE_PCFGZ_SUPPORT    = N
FBVGA                 = N
VTSWITCH              = N
GPMMOUSE              = N
SCANKBD               = N
RTEMS_BUILD           = /path/to/your/rtems/build
RTEMS_BSP             = nds
RTEMS_TARGET          = arm-rtems4.8
Next, the following patch must be applied:
--- drivers/romfont.c
+++ drivers/romfont.c
@@ -12,6 +12,7 @@
  * The environment variable CHARHEIGHT if set will set the assumed rom
  * font character height, which defaults to 14.
  */
+#ifdef FBVGA
 #include <stdlib.h>
 #include "device.h"
 #include "vgaplan4.h"
@@ -181,3 +182,4 @@
   }
 }
 #endif /* NOTUSED*/
+#endif
--- include/windef.h    2008-01-15 03:09:18.000000000 +0100
+++ include/windef.h    2008-01-15 03:04:13.000000000 +0100
@@ -64,11 +64,11 @@
 typedef unsigned char          UCHAR;
 typedef unsigned short                 USHORT;
 typedef unsigned long          ULONG;
-#ifndef __ITRON_TYPES_h_ /* FIXME RTEMS hack*/
+#ifndef _ITRONSYS_TYPES_H /* FIXME RTEMS hack*/
 typedef unsigned int           UINT;
 #endif

-#ifndef __ITRON_TYPES_h_
+#ifndef _ITRONSYS_TYPES_H
 #ifndef COMMON_H        /* MiniGUI hack*/
 typedef int                    BOOL;
 #endif
@@ -80,7 +80,7 @@
 typedef USHORT *               PUSHORT;
 typedef UCHAR *                        PUCHAR;
 typedef char *                 PSZ;
-#ifndef __ITRON_TYPES_h_
+#ifndef _ITRONSYS_TYPES_H
 typedef int                    INT;
 #endif
 typedef unsigned int           *PUINT;
--- mwin/winevent.c  2008-01-15 03:10:13.000000000 +0100
+++ mwin/winevent.c     2008-01-15 03:02:44.000000000 +0100
@@ -14,7 +14,7 @@
 #include <string.h>

 #if !(DOS_TURBOC | DOS_QUICKC | _MINIX | VXWORKS)
-static int
+int
 abs(int n)
 {
        return n >= 0? n: -n;
Then, the source is able to be build.
$ makeCompiling should stop with an error after the line:
Compiling rtems/rtems_init.c ...This is not a problem, the only required files are in src/lib.
$ ls lib
libmwdrivers.a  libmwfonts.a   libmwin.a     libnano-X.a
libmwengine.a   libmwimages.a  libmwinlib.a
AM_CFLAGS += -I$(MWIN)/include -I$(exec_prefix)/nds/lib/include/libnds/
AM_LDFLAGS += -L$(MWIN)/lib
LINK_LIBS +=  -lmwin -lmwinlib -lmwengine -lmwdrivers -lmwfonts -lmwimages -lm
Creating the initial task for the application is more complicated. The following C source can be used as a template:
#define  CONFIGURE_INIT
#include <stdio.h>
#include "rtemscfg.h"
#define ARM9
#include <nds.h>

/* this is the command line options to be passed to the main routine */
char *cc_argv[] =
  {
    "cc_main",    /* arg[ 0 ] -- always the name of the program */
  };
int cc_argc = sizeof(cc_argv) / sizeof(cc_argv[0]);

extern int rtems_main(int argc, char **argv);

/*
 * DESCRIPTION: Init task for any Microwindows/RTEMS application.
 */

void *POSIX_Init( void *argument )
{
#ifdef SWAP_LCD
  lcdSwap();
#endif

  rtems_main(cc_argc, cc_argv);
  pthread_exit(NULL);
  return NULL;
}
The file above includes the file rtemscfg.h which looks like:
#include <bsp.h>

#include <rtems/fb.h>
#include <rtems/console.h>
#include <rtems/clockdrv.h>
#include <rtems/touchscreen.h>

/* comment this line to disable lcd screen swapping. */
#define SWAP_LCD

/* configuration information */
#define CONFIGURE_MAXIMUM_DEVICES                     40
#define CONFIGURE_MAXIMUM_TASKS                       100
#define CONFIGURE_MAXIMUM_TIMERS                      32
#define CONFIGURE_MAXIMUM_SEMAPHORES                  100
#define CONFIGURE_MAXIMUM_MESSAGE_QUEUES              20
#define CONFIGURE_MAXIMUM_PARTITIONS                  100
#define CONFIGURE_MAXIMUM_REGIONS                     100
#define CONFIGURE_MAXIMUM_POSIX_MUTEXES               32
#define CONFIGURE_MAXIMUM_POSIX_CONDITION_VARIABLES   32
#define CONFIGURE_MAXIMUM_POSIX_KEYS                  32
#define CONFIGURE_MAXIMUM_POSIX_QUEUED_SIGNALS        10
#define CONFIGURE_MAXIMUM_POSIX_THREADS               128
#define CONFIGURE_MAXIMUM_POSIX_TIMERS                10
#define CONFIGURE_LIBIO_MAXIMUM_FILE_DESCRIPTORS      200
#define CONFIGURE_MAXIMUM_POSIX_MESSAGE_QUEUES        20
void *POSIX_Init( void *argument );
#define CONFIGURE_POSIX_INIT_THREAD_STACK_SIZE        (384*1024)
#define CONFIGURE_POSIX_INIT_THREAD_TABLE

#define CONFIGURE_HAS_OWN_DEVICE_DRIVER_TABLE

rtems_driver_address_table Device_drivers[] =
{
  CONSOLE_DRIVER_TABLE_ENTRY,
  CLOCK_DRIVER_TABLE_ENTRY,
  FB_DRIVER_TABLE_ENTRY,
  TOUCHSCREEN_DRIVER_TABLE_ENTRY,
  { NULL,NULL, NULL,NULL,NULL, NULL }
};

#include <rtems/confdefs.h>
Of course, the values above can be tuned to fit your needs.$ make MWIN=/path/to/microwindows/srcRecalls on mouse and keyboard controls can be found in section Writing a touchscreen/keyboard application.
AM_CFLAGS += -I$(MWIN)/include -I$(exec_prefix)/nds/lib/include/libnds/
AM_LDFLAGS += -L$(MWIN)/lib
LINK_LIBS +=  -lnano-X -lmwengine -lmwdrivers -lmwfonts -lmwimages -lm
Grab the Nano-Xeyes source from MicroWindows source and compile.
CFLAGS_LD += -Wl,--defsym -Wl,HeapSize=0x80000Using network in RTEMS is not so complicated. Two globals must be declared and the function rtems_bsdnet_initialize_network must be called as in the following code.
#include <bsp.h>

#include <stdlib.h>
#include <stdio.h>
#include <rtems/rtems_bsdnet.h>

/* enable or disable DHCP */
//#define BOOTP

static struct rtems_bsdnet_ifconfig netdriver_config = {
 RTEMS_BSP_NETWORK_DRIVER_NAME,
 RTEMS_BSP_NETWORK_DRIVER_ATTACH,
#ifndef BOOTP
 NULL,
 "192.168.1.10", // static ip address
 "255.255.255.0" // static submask
#endif
};
struct rtems_bsdnet_config rtems_bsdnet_config = {
 &netdriver_config,
#ifdef BOOTP
 rtems_bsdnet_do_bootp,
#else
 NULL,
 0,
 0,
 0,
 "hostname",
 "domaine.name",
 "192.168.1.1", // default gateway
 NULL,
 { "192.168.1.1" } // name servers
#endif
};

rtems_task Init(
  rtems_task_argument ignored
)
{
  printk("Starting network\n");
  rtems_bsdnet_initialize_network ();
  printk("Ok.\n");
  while (1)
    ;
  exit( 0 );
}

/* configuration information */
#define CONFIGURE_APPLICATION_NEEDS_CONSOLE_DRIVER
#define CONFIGURE_APPLICATION_NEEDS_CLOCK_DRIVER

#define CONFIGURE_RTEMS_INIT_TASKS_TABLE

#define CONFIGURE_EXECUTIVE_RAM_SIZE        (512*1024)
#define CONFIGURE_MAXIMUM_SEMAPHORES        20
#define CONFIGURE_MAXIMUM_MESSAGE_QUEUES    20
#define CONFIGURE_MAXIMUM_TASKS            200
#define CONFIGURE_LIBIO_MAXIMUM_FILE_DESCRIPTORS      20
#define CONFIGURE_INIT

#include <rtems/confdefs.h>
Of course, the CONFIGURE macros above can be tuned.CFLAGS += -I$(exec_prefix)/nds/lib/include/libnds/ -DARM9Using the libnds requires to include the file nds.h as following:
#include <nds.h>For help about the libnds features, please visit http://www.devkitpro.org/.
This document was translated from LATEX by HEVEA.